Ducky Script · Volume 8
Ducky Script Volume 8 — The USB Rubber Ducky
The canonical device — Mark I and Mark II hardware, the button/LED/microSD workflow, and why it is the reference the whole family is measured against
Contents
1. About this volume
Part II covers the four owned device families, one volume each. It opens with the USB Rubber Ducky because it is the canonical device — the original (2010/2011), the purest expression of keystroke injection, and the reference implementation of Ducky Script. The Bash Bunny, Key Croc, and O.MG all run dialects of the language and all are measured against this device. Learn this one first; the other three are deltas from it.
This volume is the hardware-and-operation treatment. The language is Part I (Vols 3-6); this is the device that runs it.
Research-baseline note. tjscientist owns a USB Rubber Ducky. Exact hardware-revision details below (especially the Mark II MCU/storage figures) are from Hak5 documentation and community sources; a
doc-auditpass against the actual unit should confirm them and record the unit inMY_GEAR/inventory.yaml.
2. What the USB Rubber Ducky is
A USB Rubber Ducky is a keystroke-injection device in a USB-flash-drive form factor. It is, deliberately, the simplest possible such device: a microcontroller, a USB interface, a microSD slot, a button, an LED. There is no operating system on it — and that is a feature, not a limitation.
   The Rubber Ducky's design philosophy: do one thing
   ════════════════════════════════════════════════════════

   no OS  ──►  nothing competes with payload replay for the CPU
              ──► deterministic timing, fast injection, no boot,
                  no background, no surprises

   The Bash Bunny and Key Croc are Linux computers — powerful,
   but they BOOT, they have a userland, they take seconds to
   be ready. The Rubber Ducky is a microcontroller that does
   exactly one job. That purity is why it's still the
   reference: keystroke injection with nothing in the way.
It looks like a flash drive because looking like a flash drive is useful — but note (and Vol 16 returns to this) it does not function as a flash drive to the target by default; it functions as a keyboard. “It’s a flash drive” is visual social engineering, not a USB-class fact.
3. The hardware — Mark I
The original production USB Rubber Ducky (2011):
| Component | Spec |
|---|---|
| MCU | 60 MHz 32-bit Atmel AT32UC3B1256 |
| Onboard flash | 256 KB |
| Removable storage | microSD card slot |
| Connector | USB-A |
| I/O | button, status LED |
| Language | Ducky Script 1.0 only |
| Encode toolchain | the Java duckencoder + community encoders |
The AT32UC3B1256 is a plain 32-bit microcontroller — fast enough to emit HID reports faster than any host needs, with no OS overhead. The 256 KB of onboard flash holds the firmware; the payload lives on the removable microSD card as inject.bin. This separation — firmware on the chip, payload on the card — is the Mark I’s enduring design: you swap payloads by swapping a file on a card, never by reflashing.
The Mark I is Ducky Script 1.0 only. It has no concept of variables, conditionals, ATTACKMODE, or any 3.0 feature. A Mark I in hand is a 1.0 device — and a perfectly capable one for the enormous class of payloads that are just “type this.”
4. The hardware — Mark II
The “New USB Rubber Ducky” (2022) — the redesign that shipped with Ducky Script 3.0:
| Component | Spec |
|---|---|
| MCU | a faster microcontroller (research-baseline — verify on the owned unit) |
| Removable storage | microSD card slot |
| Connector | USB-C and USB-A |
| I/O | button, status LED |
| Language | Ducky Script 3.0 (runs 1.0 payloads unmodified) |
| Encode toolchain | Payload Studio + a modernised encoder |
The headline practical changes from Mark I:
- USB-C and USB-A. One device targets modern laptops, desktops, and phones — a real operational gain, since target connectors are no longer a reason to carry two devices.
- Ducky Script 3.0. The whole structured language (Vols 4-6) — variables, control flow,
ATTACKMODE, Keystroke Reflection, jitter — only exists on the Mark II. - Faster. Improved injection performance over the Mark I.
- Backward compatible. Every Mark I / 1.0 payload runs unmodified.
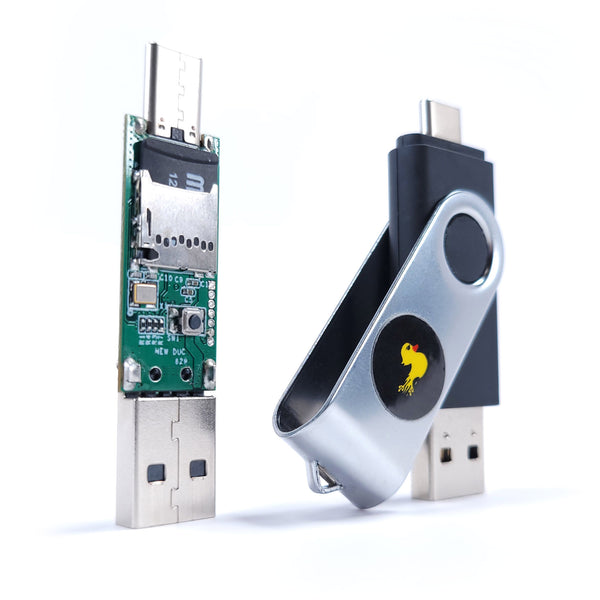
[FIGURE SLOT — Vol 8, § 4] USB Rubber Ducky Mark II — the dual-connector detail, ideally a shot showing both USB-C and USB-A ends. Source: shop.hak5.org or tjscientist’s own unit.
The practical takeaway for an owner: if the owned unit is a Mark II, the entire 18-volume language is available; if it is a Mark I, Part I Vols 4-6 are reference-only for that device (though they still apply to the Bash Bunny / Key Croc / O.MG). Confirming which is the first job of the doc-audit pass.
5. The button and the LED
Two pieces of I/O, both more useful than they look.
The button — covered as a language feature in Vol 5 §6, summarised here as hardware:
WAIT_FOR_BUTTON_PRESS— the payload halts until you press it. This is the top of the timing-reliability hierarchy (Vol 5 §9): the operator confirms the moment instead of the payload guessing it.BUTTON_DEF/END_BUTTON— a block that runs on every press, an interrupt handler. Combined withRESTART_PAYLOAD, the button can re-fire a payload, switch behaviours, or act as a panic/abort.- On a multi-payload setup, the button is the selector.
The LED — covered as a language feature in Vol 6 §8:
LED_OFF/LED_R/LED_Gplus the activity-LED internal variables.- Two operational uses: operator feedback (red = running, green = done — so you know when to pull the device without watching the target’s screen) and going dark (
LED_OFFso a blinking light doesn’t draw a bystander’s eye).
Neither is decorative. On a real engagement the button is how you avoid racing a guessed DELAY, and the LED is how you know the payload finished — or how you make sure nobody else knows it ran.
6. The microSD workflow — inject.bin, seed.bin, loot.bin
The Rubber Ducky’s payload lives on a microSD card, and the card carries up to three meaningful files:
| File | What it is | Written by |
|---|---|---|
inject.bin | the encoded payload — your payload.txt run through the encoder | you, at deploy time (Vol 12) |
seed.bin | the randomization seed (Vol 5 §8) — makes $_RANDOM_* reproducible or varied | you, optionally |
loot.bin | exfiltrated data (Vol 6 §6) — what EXFIL writes | the payload, at run time |
   The deploy <-> retrieve cycle
   ════════════════════════════════════════════════════════

   DEPLOY    payload.txt --encode--> inject.bin --> microSD
                                     seed.bin   --> microSD (optional)

   RUN       device plugged into target --> payload executes
                                        --> EXFIL writes loot.bin
                                            onto the microSD

   RETRIEVE  pull the device --> read loot.bin off the microSD
                                 on your own machine
The card is the entire I/O surface for payload management — there is no app, no pairing, no network. You write inject.bin to the card on your machine, you read loot.bin from the card on your machine. That simplicity is the Rubber Ducky’s strength (nothing to pair, nothing to break) and its limit (no remote anything — contrast the O.MG, Vol 11).
7. How a payload runs — the execution model
The Rubber Ducky’s execution model is as simple as the hardware:
   1. Device is connected to a host.
   2. Host enumerates it as an HID keyboard (and/or storage,
      per ATTACKMODE — Vol 6).
   3. Firmware reads inject.bin from the microSD card.
   4. Firmware replays it: each instruction becomes HID
      reports (keystrokes) or timing (DELAY).
   5. The payload runs top-to-bottom (with 3.0 control flow),
      until it ends, STOP_PAYLOADs, or the device is removed.
   6. The button and lock-key channel can pause/branch
      execution along the way (Vols 5-6).
There is no boot — the microcontroller is ready almost instantly, which is why the Rubber Ducky’s “plug to inject” latency is the shortest in the family. The only wait is the host enumerating the device (the opening DELAY in every payload — Vol 3 §5). Nothing on the device side takes time, because there is no OS on the device side.
This is the model the other three devices deviate from: the Bash Bunny and Key Croc boot a Linux system first (seconds of latency); the O.MG waits for a trigger rather than running on plug-in. The Rubber Ducky’s “enumerate, then immediately replay” is the baseline.
8. Strengths, limits, and when to reach for it
| Strengths | Limits |
|---|---|
| Fastest plug-to-inject latency in the family (no boot) | HID-centric — ATTACKMODE STORAGE aside, it is a keyboard |
| Deterministic timing (no OS competing for the CPU) | exfil is only Keystroke Reflection — slow, secrets-not-bulk (Vol 6) |
| Simplest workflow — a file on a card, nothing to pair | no network, no remote trigger, no remote retrieval |
| The canonical 3.0 implementation — reference behaviour | runs on plug-in; no “install and wait” (that’s the Key Croc) |
| Cheapest, smallest, most expendable | no covert form factor (it’s a stick; the O.MG is a cable) |
When to reach for the Rubber Ducky (full comparison in Vol 17):
- You have a few seconds of un-observed physical access and the payload is “just type a thing.” This is the Rubber Ducky’s home turf.
- You are learning the language — it is the canonical 3.0 implementation; everything transfers.
- You want the fastest, most deterministic injection with the least that can go wrong.
- The job does not need a network, an “install and wait” trigger, multi-vector device emulation, or a covert form factor — because if it does, one of the other three is the better tool.
9. Operating the owned unit
A practical first-contact sequence for tjscientist’s unit (and the doc-audit checklist):
- Identify the generation. Mark I (USB-A only, 1.0) or Mark II (USB-C+A, 3.0)? Connectors are the fast tell. Record it in
MY_GEAR/inventory.yaml. - Check the firmware version. The Mark II’s firmware is updatable; note the version (it determines which 3.0 features are present).
- Inspect the microSD card. What is on it now — a stock payload, a blank card, an old
inject.bin? Know before you deploy. - Encode and deploy a “hello world” (Vol 12) — the canonical first payload — against an owned test machine, set to the layout you encoded for (Vol 7).
- Exercise the button and LED — confirm
WAIT_FOR_BUTTON_PRESSand the LED commands behave as documented on this unit. - Record the unit in
MY_GEAR/inventory.yamlwith generation, firmware version, and any quirks; create its00-inventory/narrative page.
Until that pass is done, treat the Mark I/II distinction in this volume as the open question it is — it changes which half of Part I applies to this device.
10. Resources
- USB Rubber Ducky — by Hak5 (history, hardware, overview): https://docs.hak5.org/hak5-usb-rubber-ducky/usb-rubber-ducky-by-hak5/
- USB Rubber Ducky product page: https://shop.hak5.org/products/usb-rubber-ducky
- Ducky Script docs: https://docs.hak5.org/hak5-usb-rubber-ducky/
- Vol 2 — the Mark I → Mark II lineage in historical context
- Vols 3-6 — the language this device runs
- Vol 12 — the encode/deploy workflow (Payload Studio, the encoder, the SD card)
- Vol 17 — when to reach for the Rubber Ducky vs the other three
This is Volume 8 of an 18-volume series. Next: Vol 9 covers the Bash Bunny — the device that is a full quad-core Linux box that also injects keystrokes: ATTACKMODE, QUACK, the bash payload environment, and multi-vector attacks (storage, serial, ethernet).