DSTIKE Hackheld · Volume 6
DSTIKE Hackheld Volume 6 — Web Interface — Full Users Guide
Every page, every button, default credentials, troubleshooting
6.1 First connection
The Hackheld boots as a Wi-Fi access point. The connection flow on any device with a Wi-Fi radio (laptop, phone, tablet, another ESP):
- Power on the Hackheld (slide power switch or plug in USB-C — the firmware boots in ~3 seconds).
- The OLED shows the home menu: Scan / SSIDs / Stations / Names / Attack / Settings / Info.
- On your client device, open the Wi-Fi picker. The Hackheld’s SSID
pwnedappears. - Connect with password
deauther. Your client device gets DHCP-assigned an IP in the192.168.4.x/24range. - Open a browser. Navigate to
http://192.168.4.1(the SoftAP gateway IP). - The Deauther web UI loads.
The captive-portal trick that some “evil” portals use — automatic redirect to the captive page — is not implemented in Spacehuhn’s firmware. You have to type the URL manually. Most modern OS Wi-Fi clients (iOS / Android / macOS / Windows 10+) detect that the SoftAP has no internet uplink and pop a captive-portal banner; clicking the banner takes you to a captive-detect endpoint, which the firmware does not serve. Just close the banner and type the URL.
iOS captive-portal nag: iOS will detect “no internet” on the Hackheld’s SoftAP and prompt every minute or so. The fix is to enable “Use This Network Without Internet” in Wi-Fi settings → tap the (i) → “Auto-Join” off / “Use Without Internet” on. Same on Android.
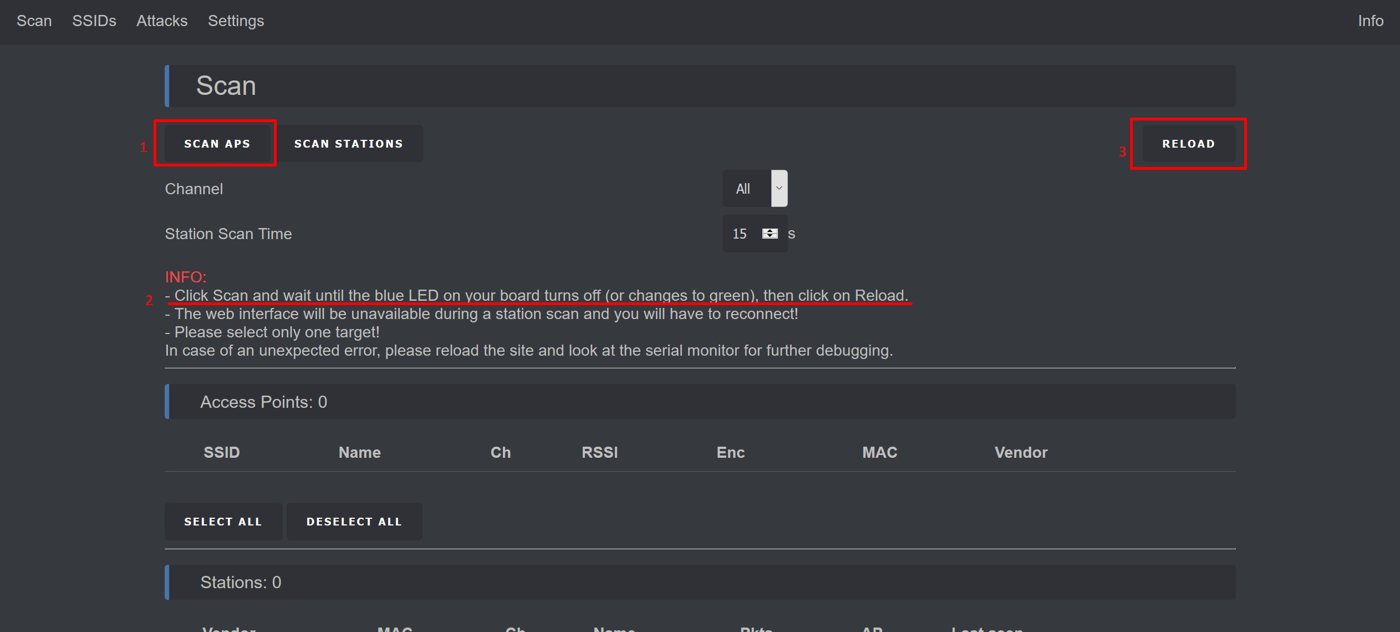
Figure 6.1 — The Deauther web UI Scan page. Source: docs.spacehuhn.com.
6.2 Default credentials
Out of the box, the firmware ships with:
Table 1 — Out of the box, the firmware ships with
| Field | Value |
|---|---|
| SSID | pwned |
| Password | deauther |
| Authentication | WPA2-PSK |
| Channel | 1 |
| IP (the Hackheld) | 192.168.4.1 |
| DHCP range (clients) | 192.168.4.2 – 192.168.4.10 |
| Web UI URL | http://192.168.4.1 |
These are universally known and trivially found via nmcli or any Wi-Fi scanner. Before any real fieldwork, change them from the Settings page (§10).
6.3 URL map
The full list of URLs the firmware serves:
Table 2 — The full list of URLs the firmware serves
| URL | Type | Purpose |
|---|---|---|
http://192.168.4.1/ | static HTML | Home / launcher |
http://192.168.4.1/scan.html | static HTML | Scan page |
http://192.168.4.1/ssids.html | static HTML | SSID list editor |
http://192.168.4.1/stations.html | static HTML | Station list |
http://192.168.4.1/names.html | static HTML | Named target editor |
http://192.168.4.1/attack.html | static HTML | Attack launcher |
http://192.168.4.1/settings.html | static HTML | Settings |
http://192.168.4.1/info.html | static HTML | Info |
http://192.168.4.1/api/* | JSON | The control plane — see §12 |
All static HTML lives in SPIFFS; the firmware serves it via the embedded HTTP server. The JS frontend bundle (~30 KB) is loaded once and stays cached in the browser; subsequent navigation between tabs is JS-driven and doesn’t re-fetch HTML.
6.4 The Home page
The landing page (http://192.168.4.1/). What you see:
- Top banner: “WiFi Deauther” with a version string (e.g. v2.6.1).
- Six large rectangular buttons leading to the other pages — Scan, SSIDs, Stations, Names, Attack, Settings.
- A small Info link at the bottom.
Click any of the six rectangles to navigate. The buttons are styled with the firmware’s signature black/red colour scheme (red highlight on hover; black background; monospace font).
Mobile-responsive: the page reflows on narrow screens (phone in portrait) — the buttons stack vertically. Works on iOS Safari, Android Chrome, desktop Chrome / Edge / Firefox / Safari.
6.5 The Scan page
The Scan page is the entry point for everything else — discover what’s around before deciding what to do.
UI elements (top to bottom):
- Mode selector: radio buttons for AP / Stations / Names. The default is AP (most-common starting point).
- Channel-range field: text input, default
1-14. Constrains the channels scanned. - Scan time field: text input, default
15seconds. Longer = more thorough station-discovery; default is sufficient for AP scan. - Start scan button: red rectangle. Click to begin.
- Result table: appears below after scan completes. Columns:
- Selection checkbox (left)
- Index #
- For AP mode: SSID, MAC (BSSID), Channel, RSSI, Encryption type, Vendor
- For Station mode: MAC, Vendor, RSSI, Channel, Associated AP
- For Names mode: Index, Name, MAC, “Selected” checkbox
- Save selected to Names button: bottom — converts selected entries into named targets.
Typical workflow:
- Click Scan / Start scan. The status changes to “Scanning…” for ~3 seconds. The OLED on the Hackheld also updates (you’ll see the channel cycling on the device’s display).
- Result table populates with visible APs.
- Tick the checkboxes next to interesting APs.
- Click Save selected to Names. The selected entries land on the Names page.
- Repeat for Stations mode if you want client-MAC-level targets.
Status bar at top shows realtime info: scan in progress, time remaining, total found.
Edge cases:
- Empty result: no APs visible. Move closer to a known AP and re-scan. The Hackheld’s 25 dBm PA is TX-side; receive sensitivity is a different chain and is governed by the LNA.
- Many APs in dense environments: result table can show 60+ entries. The firmware caps at 60; if you have more in range, older entries are evicted.
6.6 The SSIDs page
The SSID list is the input to the beacon spam attack. The page is a simple editor:
UI elements:
- Search box: filter the list by substring.
- Add SSID field: text input.
- Random SSID button: generates a random 8-character SSID and adds it.
- Random-clone button: generates several variations of an existing SSID (case mixing, character substitution) — useful for confusion attacks against a target network.
- Clear all button: empty the list.
- List table: rows with SSID + encryption type (open / WPA2) + WPA2-randomized BSSID prefix + remove button.
Typical workflow:
- Click Random SSID a few times to get a list of fake SSIDs.
- Or paste in a CSV of known venue SSIDs (
xfinitywifi,attwifi,Starbucks WiFi, etc.) that you want to spam. - Save → the list persists in SPIFFS (
/ssids.txt). - Go to the Attack page to launch beacon spam against this list.
Capacity (v2.6.1): ~200 SSIDs max — limited by SPIFFS partition size.
6.7 The Stations page
The Stations page shows the list of client devices observed during station scans. Same UI structure as the AP table on the Scan page; this is the data source for client-targeting deauth attacks.
Columns:
- Index
- MAC address (the client’s MAC)
- Vendor (from OUI lookup)
- RSSI (last seen)
- Associated AP (BSSID)
- Channel
- Last-seen timestamp (in seconds-ago format)
Workflow: select the stations to target → save them to Names → go to Attack page → select Deauth attack targeting these stations.
6.8 The Names page
The Names page is the persistent target list. APs and stations from RAM-only tables get promoted to Names with friendly labels.
Columns:
- Index
- Name (editable)
- MAC
- Type (AP / Station / Group)
- Selected checkbox
Group is a feature for grouping multiple MACs under one name — e.g. “Living room” might be a group containing the TV’s MAC + a laptop’s MAC. Attacks can target groups.
Persistent: lives in SPIFFS (/names.txt). Survives reboot.
6.9 The Attack page
The attack launcher. This is where you actually start a deauth / beacon spam / probe spam.
Three attack-type tabs:
Table 3 — Three attack-type tabs
| Tab | Selects targets from | Effect |
|---|---|---|
| Deauth | Names (Type: Station or AP) | Forge deauth frames against each target |
| Beacon | SSIDs page | Spam fake beacons advertising those SSIDs |
| Probe | SSIDs page (re-used as probe SSIDs) | Spam fake probe requests for those SSIDs |
For each tab:
- Target selection (which Names or SSIDs to attack)
- Frame rate dropdown: Slow / Medium / Fast (≈1, 10, 50 frames/sec/target)
- Start attack button
Once running:
- The OLED shows the attack name + target count + frame rate.
- The web UI’s Attack tab shows a “Running” status with live frame count.
- A Stop button replaces the Start button.
Stopping is essential — attacks continue until you press Stop or reboot the device. Multiple attacks can run simultaneously (deauth + beacon spam, for example) but each adds memory pressure and TX duty-cycle pressure on the radio.
6.10 The Settings page
Configurable from the web UI; changes persist to SPIFFS.
Categories:
Wi-Fi:
- SSID (default
pwned) — change this immediately - Password (default
deauther) - Channel (default 1)
- Hide SSID (boolean — hides the SoftAP from clients’ Wi-Fi-picker; useful for stealth)
Display:
- Display on/off
- Display timeout (auto-off after N seconds; default 0 = never)
- Display rotate (180° flip)
Scan:
- Default scan time (seconds)
- Default channel range
Attack:
- Default frame rate
- Random source MAC (for beacon/probe spam — use random vs sequential)
Authentication:
- Web-UI password — secondary password gating the web UI (separate from the Wi-Fi password)
System:
- Reset to factory defaults (wipes Names, SSIDs, settings)
- Reboot
6.11 The Info page
Read-only status:
- Firmware version
- ESP8266 chip ID
- Free heap
- Uptime
- Wi-Fi mode (currently SoftAP, STA, both)
- Wi-Fi channel
- Connected clients to SoftAP
- IP address
- SoftAP MAC
- Settings file path
- SPIFFS used/free space
- A link to the Spacehuhn GitHub for source
6.12 JSON API endpoints
Anything the web UI does, the JS makes via JSON-over-HTTP. You can use these endpoints from curl, Python requests, or your own automation. Examples:
# Get list of APs from the last scan
curl http://192.168.4.1/api/scan/aps

# Start a scan
curl -X POST http://192.168.4.1/api/scan/start

# Start a deauth attack against named target #2
curl -X POST 'http://192.168.4.1/api/attack/start?type=deauth&target=2'

# Stop all attacks
curl -X POST http://192.168.4.1/api/attack/stop

# Get current status
curl http://192.168.4.1/api/info
Full endpoint list (v2.6.1):
Table 4 — Full endpoint list (v2.6.1)
| Endpoint | Method | Response |
|---|---|---|
/api/info | GET | JSON status |
/api/scan/start | POST | starts scan |
/api/scan/aps | GET | AP list as JSON |
/api/scan/stations | GET | station list |
/api/names | GET / POST | named targets |
/api/names/save | POST | persist names |
/api/ssids | GET / POST | SSID list |
/api/attack/start | POST | start attack (params: type, target) |
/api/attack/stop | POST | stop all attacks |
/api/attack/status | GET | running attacks |
/api/settings | GET / POST | settings |
/api/reset | POST | factory reset |
/api/reboot | POST | soft reboot |
Useful for scripting — see Vol 11 § Automation for a Python script that drives a scan + attack cycle.
6.13 Multi-browser support
The Hackheld’s SoftAP supports up to 4 simultaneously-connected clients (the SDK default). The web UI tolerates 2 simultaneous browser connections without problems. Beyond that, memory pressure becomes visible — page loads slow, JSON responses time out occasionally.
For a real ops session, connect from one browser, do the work, disconnect. Don’t keep three tablets, two laptops, and your phone all on the SoftAP at once.
6.14 Troubleshooting
Table 5 — 14. Troubleshooting
| Symptom | Likely cause | Fix |
|---|---|---|
pwned SSID isn’t visible from my phone | Hackheld booting; OLED off; battery dead | Plug in USB-C, wait 3 seconds, confirm OLED lights up |
Page won’t load — 192.168.4.1 says “not reachable” | Captive-portal redirector intercepting | Disable captive-portal detection on the client (iOS: “Use without internet”; Android: similar) |
| Page loads, but Start Scan does nothing | Web UI cached an older version after a firmware update | Hard-refresh the browser (Cmd-Shift-R / Ctrl-Shift-R) |
| Scan returns “0 APs” but I know APs are around | Power-cycle the Hackheld; check antenna is intact | If still 0 APs after power-cycle, suspect a firmware corruption — re-flash 2.6.1 |
| Attack starts but no targets are deauthenticated | Targeted clients are using WPA3 or MFP-protected WPA2 | This attack doesn’t work against MFP; confirm target is plain WPA2 / WEP |
| Attack starts but the Hackheld reboots mid-attack | Battery near depleted; brownout under TX peak | Plug in USB-C and re-launch — or stop the attack until charged |
| OLED is dim or pixels missing | OLED burn-in from long static display | Reduce contrast (Settings → Display) or replace the panel (Vol 3 §12) |
| Web UI Password is set, forgot it | Factory reset clears it | Connect via USB-C, use the CLI clear command (Vol 7), or fully reflash |
6.15 What’s next
→ Vol 7 — CLI Command Reference — every serial command, syntax, examples, and scriptable workflows. The CLI is the same engine as the web UI, just over a different transport.
Comments (0)