Ruckus Game Over · Volume 4
Game Over Module — Volume 4
Install Procedures
Step-by-step procedures for getting firmware onto the Game Over’s
ESP32-S3. Covers the four realistic paths — vendor’s dirty_flasher,
upstream Marauder via web flasher / esptool, Ghost ESP, and custom IDF
build flashing — plus the recovery procedure if something goes wrong.
This is a how-to volume. The “which firmware” decision is in Vol 3.
Pre-flight checklist
Before flashing anything:
- Antenna installed on the ESP32-S3 SMA jack. (Don’t power up a bare RF transmitter — Vol 2 § 7.3.)
- Daughter card in the correct orientation, or removed entirely. Wrong orientation kills NRF24 cards (Vol 7 § 3).
- microSD card inserted if you want to verify SD initialization after flash. Use Lexar or Kingston (Vol 2 § 6.1).
- USB-C cable that’s known to be a data cable, not power-only. Test with another device first if uncertain.
- Game Over disconnected from any Flipper for the first flash — don’t run flash procedures with the module mounted on a Flipper until you’ve confirmed the toolchain works. The vendor’s safety warning about powered-Flipper attachment (Vol 2 § 9) applies.
- Driver installed on Windows — Silicon Labs CP210x or CH340C, depending on the USB-UART bridge fitted to your Game Over batch. macOS / modern Linux don’t need this.
- Backup the existing binary if possible, before overwriting (§ 7 below). This is optional but cheap insurance.
4.1 Path A — vendor dirty_flasher (default)
The vendor’s flashing tool is the path the Tindie product page directs buyers to. It’s the simplest if you trust the vendor binary and want to follow the documented update path.
4.1.1 Where to get dirty_flasher
The exact URL changes; check the Tindie product page (under “Firmware: dirty_flasher (BETA)”) or message the vendor through Tindie. The tool is typically distributed as either:
- A Windows .exe (Electron-wrapped, single executable).
- A Python script + binaries (cross-platform — runs
esptool.pyunder the hood). - A GitHub release — sometimes the vendor mirrors it there, but expect the canonical URL to be vendor-controlled.
If the vendor’s distribution channel is unavailable temporarily, check
the YouTube tutorial channels referenced in modules_owned.md
(youtube.com/watch?v=kOBq0eK1vdA is the canonical “How to update Game
Over” walkthrough) — they sometimes link to mirror downloads.
4.1.2 Procedure
- Download dirty_flasher from the vendor link.
- Verify the download if the vendor publishes a SHA256 (some versions do, some don’t). At minimum check the file size and timestamp against what other buyers report.
- Connect the Game Over via USB-C to your laptop. (Use Game Over’s own USB-C jack, not the Flipper. The Flipper bridge path is § 4 below.)
- Run dirty_flasher. It auto-detects the COM/tty port the Game Over presented as.
- Pick “Game Over” as the target board (the tool may have more than one board target if it also supports End Game or other vendor products).
- Pick the firmware version. Latest is usually the right choice unless the release notes describe a regression you want to avoid.
- Click Flash. The tool will:
- Put the ESP32-S3 into ROM bootloader mode (it can drive BOOT/RESET via the USB-CDC line state, no buttons needed).
- Write the bootloader, partition table, and application binary at standard offsets.
- Verify the flash by reading back.
- Reset the ESP into the new firmware.
- Wait for the OLED to display the Marauder boot logo. ~3–5 seconds after the flash completes.
- Test: navigate to Wi-Fi → AP Scan. APs should appear within a few seconds. If they do, the flash was successful.
4.1.3 If dirty_flasher fails
Common failure modes:
- “Failed to connect” — wrong port selected, or the ESP isn’t in bootloader mode. Try unplug-replug, then re-run.
- “Driver not found” — Windows missing the CP210x or CH340 driver.
Install from
silabs.com(CP210x) orwch.cn(CH340). - “Signature mismatch” / “Invalid bootloader” — the binary in the flasher doesn’t match what the chip expects. Re-download dirty_flasher in case the binary is corrupt.
- “Erase failed” — the chip might have flash protection enabled
(uncommon but possible on some batches). Use esptool.py manually to
erase first:
esptool.py --port /dev/ttyUSB0 erase_flash.
If dirty_flasher refuses to work, fall back to esptool.py directly (§ 5).
4.2 Path B — Upstream Marauder via web flasher
The Marauder project hosts a Web Serial flasher on GitHub Pages. This is the audit-friendly equivalent of dirty_flasher.
4.2.1 The web flasher URL
Search the Marauder wiki (github.com/justcallmekoko/ESP32Marauder/wiki)
for the “Web Flasher” page; the URL is typically
justcallmekoko.github.io/ESP32Marauder/flasher.html or similar.
Alternative web flashers that also work for Marauder Dev Board Pro binaries:
- FZEE Flasher (
fzeeflasher.com) — supports Game Over via the Marauder Dev Board Pro preset. - VoyagerRF (
kashmir54.github.io/voyagerrf/) — Marauder fork with extra Flipper integrations.
All three are Web Serial — Chrome or Edge required (Firefox doesn’t support Web Serial).
4.2.2 Procedure
- Open the web flasher in Chrome/Edge.
- Connect Game Over via its own USB-C.
- Click Connect. In the Web Serial dialog, pick the new COM/tty port that just appeared.
- Select board: Marauder Dev Board Pro (the closest matching preset).
- Select firmware: Marauder, latest.
- Click Program / Flash. Wait 60–120 s.
- Reset when the flasher says “FLASHING COMPLETE.”
- Verify: OLED boots into Marauder. Note: the OLED might show slight visual quirks (logo not perfectly centered, RGB LED status colors differ) compared to the vendor binary — this is the cost of using the upstream binary on Game-Over-specific hardware. If the functional menus work and AP scan returns results, the flash is good.
4.2.3 If the OLED stays black after upstream Marauder flash
Most likely cause: OLED I²C pinout mismatch between Marauder Dev Board Pro reference and Game Over actual. The functional radio subsystems still work — you just can’t see the menu.
Mitigation options:
- Use Marauder via the Flipper companion FAP (§ 4) — bypass the OLED entirely; drive everything from the Flipper screen. Confirms that the flash itself worked.
- Build from source with the correct pin map (Vol 3 § 6).
- Reflash the vendor binary to recover OLED functionality, accept the supply-chain caveat.
This is rare — the upstream and vendor pinouts are usually close enough to work — but plan for it as a possibility.
4.3 Path C — Flash via the Flipper UART bridge
The Game Over supports flashing the ESP32-S3 from the Flipper itself, using the Flipper’s USB-CDC connection as a UART bridge to the ESP. This is the path the Marauder companion FAP supports as “Update ESP32.”
This path is convenient because:
- No need for a separate USB-C cable to Game Over.
- Works while Game Over is mounted on the Flipper.
- Single laptop port to deal with.
It’s slightly more fragile because the bridge path adds latency and some flashers don’t handle it gracefully.
4.3.1 Prerequisites
- A Flipper Zero with a recent firmware that includes the Marauder companion FAP (Momentum mntm-012, Unleashed, RogueMaster, or any recent Xtreme fork — Vol 5 covers this).
- The Flipper connected to your laptop via USB-C.
- Game Over mounted on the Flipper’s GPIO header. Mount the module while the Flipper is powered off. (Vendor warning, Vol 2 § 9.)
- The Marauder web flasher (or dirty_flasher) on the laptop.
4.3.2 Procedure
- Power off the Flipper.
- Mount Game Over on the GPIO header. Check orientation — pin 1 alignment.
- Power on the Flipper.
- Open the Marauder companion FAP on the Flipper. Navigate to Settings → Flash Mode (exact menu path varies by firmware).
- Select Update ESP32 or “Enter flash mode.” This puts the Flipper into a USB-CDC bridge mode that exposes the ESP32-S3’s serial directly.
- On the laptop, the Flipper now appears as a serial port. The ESP32-S3 is on the other end.
- Run the web flasher (or dirty_flasher, or esptool.py) and point it at the Flipper’s COM/tty port. From the flasher’s perspective, it looks like an ESP32-S3 directly attached.
- Flash as normal.
- Exit flash mode on the Flipper when done. The companion FAP resumes normal operation.
4.3.3 Why this path can fail
- The Flipper firmware’s flash-bridge mode might be flaky in older builds. Update Flipper firmware first.
- The bridge introduces UART buffering delays that strict flash utilities can choke on. Some web flashers retry automatically; some don’t.
- It draws power from the Flipper during flash — the same brownout risk discussed in Vol 2 § 8 applies. For long flashes, prefer Game Over’s own USB-C.
If the bridge path fails, fall back to Game Over’s own USB-C (§ 2 or § 3).
4.4 Path D — esptool.py (manual, always works)
When the polished tools fail, esptool.py is the always-works fallback. It’s the same tool dirty_flasher and the web flashers wrap.
4.4.1 Install esptool
pip install --upgrade esptoolOr with —break-system-packages on modern Linux:
pip install --upgrade esptool --break-system-packages4.4.2 Identify the chip
esptool.py --port /dev/ttyUSB0 chip_idReplace the port with whatever the Game Over enumerated as. Expected output mentions ESP32-S3 along with a chip ID and MAC address. If you see “ESP32” without “-S3,” you’re not connected to the right chip (Game Over is definitely S3).
4.4.3 Erase
esptool.py --port /dev/ttyUSB0 erase_flashThis wipes the existing binary entirely. Optional — flash will overwrite — but useful when the existing binary is corrupted in a way that prevents normal flash (rare).
4.4.4 Flash a Marauder Dev Board Pro binary
Download the appropriate ..._marauder_dev_board_pro.bin from
GitHub Releases. Then:
esptool.py --chip esp32s3 \
  --port /dev/ttyUSB0 \
  --baud 921600 \
  write_flash \
  -z 0x0 esp32_marauder_v0.13.X_marauder_dev_board_pro.bin
Note the --chip esp32s3 flag — different from ESP32-classic. The
offset 0x0 works for monolithic Marauder builds (which include
bootloader + partition table + app in one image). Check the release
notes for your specific Marauder version — some releases require
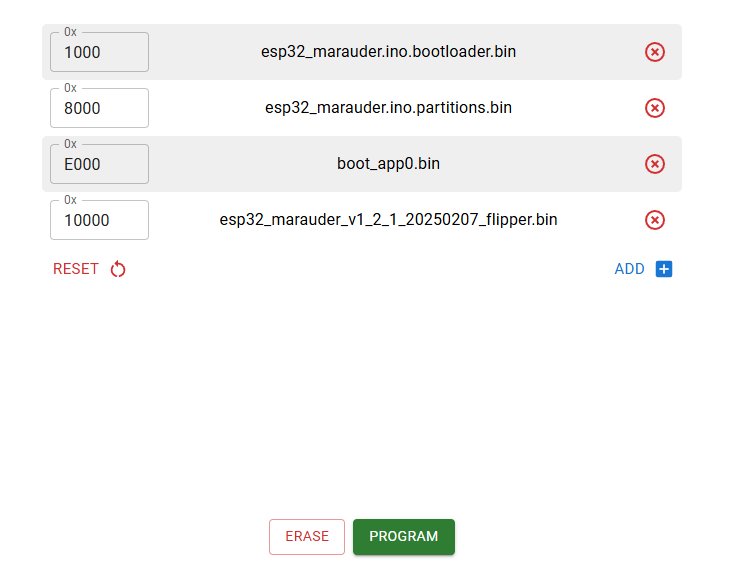
multi-offset flash:
esptool.py --chip esp32s3 \
  --port /dev/ttyUSB0 \
  --baud 921600 \
  write_flash \
  0x0 bootloader.bin \
  0x8000 partitions.bin \
  0x10000 marauder.bin
4.4.5 Verify
esptool.py --port /dev/ttyUSB0 verify_flash 0x0 marauder.binIf it returns “FLASH OK”, the binary is byte-correct on the chip.
4.4.6 Reset and boot
esptool.py --port /dev/ttyUSB0 runOr pull the cable and replug. The ESP-S3 boots into the new firmware.
4.5 Path E — Ghost ESP via web flasher
Ghost ESP’s web flasher is at ghostesp.net. Same general procedure
as § 3, with the board preset set to “Marauder Dev Board Pro” (since
Game Over is not specifically listed) or “ESP32-S3 (generic)” if that
option exists.
Caveats from Vol 3 § 2.4.3 apply:
- microSD support uncertain on Game Over class — verify post-flash.
- OLED driver may need pin tweaks — same risk as upstream Marauder but slightly higher.
4.6 Backing up the existing binary (before overwriting)
If you want to preserve the vendor’s binary before flashing something else:
esptool.py --port /dev/ttyUSB0 \
  --chip esp32s3 \
  read_flash 0x0 0x800000 backup_8mb.bin
The size argument (0x800000 = 8 MB) should match the chip’s flash
size. If your unit is 4 MB (vendor doesn’t publish this; verify with
esptool.py flash_id), use 0x400000.
This produces a binary you can re-flash later with write_flash 0x0 backup_8mb.bin if you decide to revert.
The backup contains the vendor’s binary — meaning if you share it publicly, you may be running afoul of the vendor’s intent (closed source). For personal archival use it’s fine; treat it like any backup you wouldn’t publish.
4.7 Recovery from a brick
The ESP32-S3 ROM bootloader is un-brickable from software alone — it lives in mask ROM. Worst case, you get a non-booting application, not a chip you can’t talk to.
4.7.1 Symptoms of a “brick”
- OLED stays black after flash.
- Marauder companion FAP can’t connect.
- USB device doesn’t enumerate.
4.7.2 Recovery procedure
- Disconnect Game Over from power.
- Press and hold the BOOT button on the Game Over.
- While holding BOOT, plug the USB-C cable in (or briefly press RESET if it’s already plugged in).
- Release BOOT. The ESP-S3 is now in ROM bootloader mode.
- On the laptop, the chip should enumerate as a USB serial port.
Run
esptool.py chip_idto confirm — you should see chip info even if the application binary is corrupt. - Flash a known-good binary (vendor’s, upstream Marauder, or your custom build) using esptool.py (§ 5).
- Reset. The chip boots into the new firmware.
If the buttons are flaky on your unit, the BOOT pin (typically GPIO 0 on the S3) can be shorted to GND with a tweezer tip during reset to the same effect — read the silk on the back of the PCB to find the test point.
4.7.3 If even ROM bootloader fails
This is rare. Possible causes:
- Physical damage to the ESP32-S3 module. Check for visible damage (cracked package, browned PCB).
- Power-supply problem — the chip needs stable 3.3 V. Try an alternative USB-C power source.
- USB-UART bridge dead — if the CP210x/CH340 chip is dead, you can’t talk to the ESP via USB. Use J-Link or another SWD/JTAG path (advanced).
If the chip is dead, the board is hard-bricked; contact the vendor through Tindie for warranty support.
4.8 Verifying a successful install
Post-flash sanity checks, in order of fastest:
- OLED boots — Marauder logo appears within ~3 s of power-on.
- Joystick navigates the main menu — UP/DOWN scrolls, PUSH selects.
- AP Scan returns results — Wi-Fi → Sniffers → AP Scan → at least one AP appears within 5 s.
- BLE Scan returns results — BLE → BLE Scan → at least one BLE advertisement appears.
- microSD detected — Marauder shows the SD card status in Settings; if it says “SD: OK”, filesystem is mounted.
- Daughter card detected (if installed) — Sub-GHz menu option appears for CC1101, NRF24 menu option for NRF24.
- Flipper companion FAP connects — mount on Flipper, open Marauder FAP, banner shows the firmware version that was just flashed.
If all seven pass, the install is good.
4.9 Backup strategy (recommended)
Maintain at least three binaries in the Hack Tools archive:
- Vendor’s pre-flash binary — captured via § 7 before first reflash. Use this if you ever need to RMA the unit.
- Latest vendor dirty_flasher binary — current version. The “what’s running” reference.
- Upstream Marauder Dev Board Pro binary — current version from GitHub Releases. The audit-friendly fallback.
Optionally also:
- Your custom build (if you went down Vol 3 § 6 path).
- Ghost ESP (if you’re running it).
Store these in
Ruckus Game Over/02-inputs/binaries/ (create
the folder; not version-controlled but archived locally).
4.10 What’s next
Vol 5 covers Flipper-firmware compatibility — which Flipper firmware the vendor has tested, what works on which firmwares, and the implications for choosing a Flipper firmware for the AWOK / Game-Over host unit.
Comments (0)