GL-iNet GL-BE3600 · Volume 12
GL-iNet GL-BE3600 Volume 12 — Cheatsheet (the Laminate-Ready Field Card)
One-pagers: defaults card, mode-cycle reference, common UCI commands, recovery quick-reference, field flow
12.1 About this Volume
The synthesis volume — the one you laminate, fold into the kit bag, and pull out when you don’t have time to grep through eleven volumes. Each section here is a single conceptual page; the field flow on the last page is the most-used.
12.2 Defaults Card
Table 1 — 2. Defaults Card
| Mgmt IP | 192.168.8.1 |
| Recovery IP | 192.168.8.1 (post-flash); 192.168.1.1 (in U-Boot recovery) |
| LAN subnet | 192.168.8.0/24 |
| LAN DHCP range | .100 – .249 |
| LAN DNS | 192.168.8.1 (dnsmasq local) |
| SSH user | root |
| SSH password | (set at first-boot wizard) |
| Admin Panel URL | http://192.168.8.1 |
| LuCI URL | http://192.168.8.1/cgi-bin/luci |
| Recovery URL | http://192.168.1.1 (only after Reset+power-on hold) |
| Default LAN port | white-bezel RJ45 |
| Default WAN port | blue-bezel RJ45 |
| Power | USB-C PD 5/9/12 V |
For this specific unit (beryl):
Table 2 — For this specific unit (beryl)
| Asset tag | (not assigned) |
| Serial | 28948a560fe74fd5 |
| Primary MAC | 94:83:C4:C7:EA:E2 |
| Cloud Device ID | cl7eae2 (cloud disabled) |
| Factory SSID | GL-BE3600-ae2 |
| Current SSID | @TJ55219 |
| Factory key | 7AZS97HE4N (OEM tag — rotate as needed) |
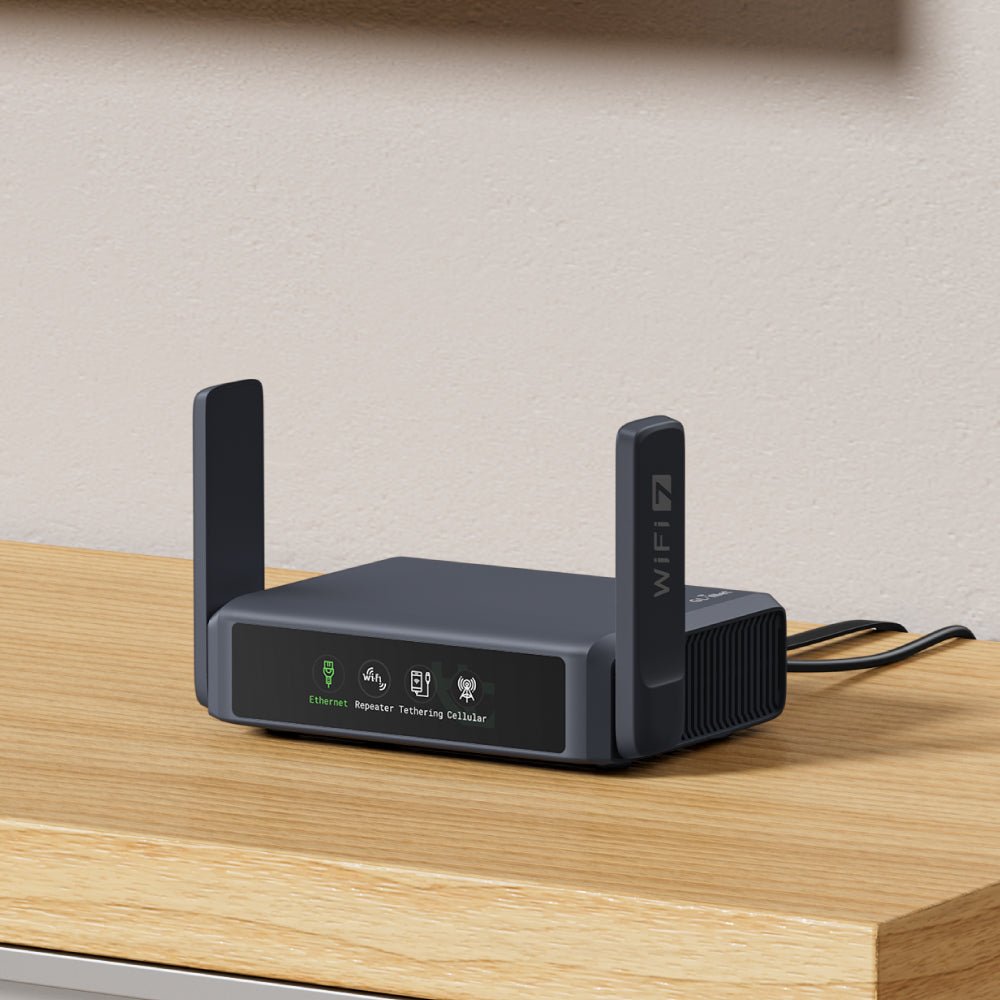
12.3 Mode-Cycle Reference
Front-panel Mode button cycles through these in order. OLED highlights the active one.
Table 3 — 3. Mode-Cycle Reference
| Icon | Mode | What it does |
|---|---|---|
| Ethernet plug | Ethernet | WAN port is upstream; LAN/Wi-Fi is downstream. Default. |
| Wi-Fi waves | Repeater | Router connects to upstream Wi-Fi as client; re-broadcasts kit SSID. |
| Phone | Tethering | USB-attached phone is upstream (RNDIS / NCM auto-detected). |
| Antenna tower | Cellular | USB cellular dongle is upstream (usb-modeswitch + AT commands). |
Switching mode takes 5–15 seconds. OLED blinks during transition.
12.4 SSH Quick-Reference
ssh [email protected]                              # connect

# Inspect:
uci show network                                  # all network config
uci show wireless                                 # all wifi config
uci show firewall                                 # all firewall config
ip link show                                      # interfaces
ip route show table all                           # routes
ip route get 8.8.8.8                              # which device for this destination
nft list ruleset                                  # nftables rules
wg show                                           # WireGuard state
mwan3 status                                      # multi-WAN state
df -h /overlay                                    # NAND space remaining

# Edit + apply:
uci set network.lan.ipaddr='192.168.10.1'
uci commit network
/etc/init.d/network restart
wifi reload                                       # for wireless changes

# Kill-switch verify:
ip link set wgclient down                         # bring VPN down
curl -4 -m 5 ifconfig.me                          # should fail
ip link set wgclient up
ifup wgclient

# Live capture to laptop:
ssh [email protected] 'tcpdump -i br-lan -U -w -' | wireshark -k -i -

# Backup:
ssh [email protected] 'sysupgrade -b /tmp/backup-$(date +%Y%m%d).tar.gz'
scp [email protected]:/tmp/backup-*.tar.gz ./

# Reboot / factory reset:
reboot                                            # clean reboot
firstboot && reboot now                           # factory reset (wipes overlay)
12.5 Common UCI Edits
# Change LAN subnet (avoid clash with venue's network)
uci set network.lan.ipaddr='192.168.20.1'
uci commit network && /etc/init.d/network restart

# Change Wi-Fi SSID
uci set wireless.default_radio0.ssid='@MyTrip'
uci set wireless.default_radio1.ssid='@MyTrip'
uci commit wireless && wifi reload

# Change Wi-Fi password
uci set wireless.default_radio0.key='newpassword'
uci set wireless.default_radio1.key='newpassword'
uci commit wireless && wifi reload

# Set country code (regulatory)
uci set wireless.radio0.country='US'
uci set wireless.radio1.country='US'
uci commit wireless && wifi reload

# Clone WAN MAC (for stubborn captive portals)
uci set network.wan.macaddr='aa:bb:cc:dd:ee:ff'
uci commit network && /etc/init.d/network restart

# Enable / disable WireGuard tunnel
ifup wgclient                                     # bring up
ifdown wgclient                                   # bring down

# Tighten mwan3 failover speed
uci set mwan3.wan_eth.interval='2'
uci set mwan3.wan_eth.down='2'
uci set mwan3.wan_eth.up='4'
uci commit mwan3 && mwan3 restart
12.6 Recovery Quick-Reference
12.6.1 Soft factory reset (overlay wipe)
- Router running, hold Reset ~5 seconds.
- Status LED flashes; release.
- ~60 seconds → router back at
192.168.8.1with factory defaults.
12.6.2 U-Boot recovery (firmware re-flash)
- Power off (unplug USB-C).
- Hold Reset.
- Plug USB-C in while still holding Reset.
- Wait ~10 seconds for status LED’s recovery blink pattern.
- Release Reset.
- Connect laptop to a LAN port, set IP to DHCP or static
192.168.1.10/24. - Browse to
http://192.168.1.1. - Upload firmware
.img(GL-iNet release or OpenWrt sysupgrade.bin). - Wait for flash to complete; reboot is automatic.
12.6.3 TFTP serial recovery (when U-Boot recovery doesn’t trigger)
Only needed when recovery (§6.2) doesn’t respond. Requires:
- USB-to-TTL serial adapter (3.3 V — CP2102 or FTDI232)
- Soldering to test pads inside the case
- TFTP server on the laptop
factory.binfor the BE3600
See Vol 4 §6 for the procedure. Don’t open the case unless §6.2 has failed.
12.7 The Field Flow
The page that earns its laminate. The travel sequence end-to-end.
ARRIVAL AT VENUE
│
├─ 1. Power up router (USB-C PD, status LED solid green)
│
├─ 2. Connect input
│      ├─ Wired Ethernet → plug into WAN
│      ├─ Wi-Fi only      → Mode button → Repeater → scan → connect
│      └─ Phone tether    → plug phone in USB → Mode → Tethering
│
├─ 3. Captive portal? (browser shows redirect)
│      ├─ Yes → Admin Panel helper, OR open laptop browser, click T&Cs
│      └─ No  → Continue
│
├─ 4. Verify internet WITHOUT VPN
│      └─ Laptop browser to any HTTPS site — should load
│
├─ 5. Bring up VPN
│      └─ Admin Panel → VPN → WireGuard → Connect
│
├─ 6. Verify VPN
│      └─ curl -4 ifconfig.me — should show provider IP, not venue
│
├─ 7. Verify kill-switch
│      ├─ ip link set wgclient down
│      ├─ curl -4 -m 5 ifconfig.me — should FAIL
│      └─ ip link set wgclient up; ifup wgclient
│
├─ 8. Verify DNS doesn't leak
│      ├─ tcpdump -i wan port 53 (in another terminal)
│      └─ Trigger DNS query; expect ZERO traffic on wan port 53
│
└─ 9. Devices join kit SSID
       └─ Laptop · Phone · Flipper · etc.

DEPARTURE FROM VENUE
│
├─ 1. Disconnect input (unplug Ethernet, leave Wi-Fi range)
│
├─ 2. Verify failover
│      └─ mwan3 status should show next member up
│
└─ 3. Power down router if done with venue connectivity
       └─ Save the next venue some startup time
12.8 The Diagnostic Triple
When something is wrong, run these three commands. The output usually tells you what’s wrong.
ip route get 8.8.8.8           # Is the destination going through the tunnel?
wg show                         # Is WireGuard's last handshake recent?
mwan3 status                    # Which WAN member is up; which policy is active?
If ip route get 8.8.8.8 shows the wrong device → routing problem (kill-switch misconfigured, mwan3 misbehaving, VPN routes not added).
If wg show shows old handshake → tunnel is dead despite the interface being “up”.
If mwan3 status shows unexpected member → tracker is wrong about something.
12.9 Final Word
The router exists to make travel networking boring. The first trip with a new BE3600 setup is exciting; by the third trip, the bring-up sequence should be muscle memory and the device should be functionally invisible. If the kit ever feels like a tax instead of an enabler, something’s misconfigured — work the decision tree in Vol 11 §5 and tighten what’s loose.
Then update Vol 11 §3 with whatever you learned, and the next trip is one step easier.
Comments (0)